Showing posts with label Windows Server 2012 R2. Show all posts

Saturday, 31 July 2021

How to Install .Hyper-V in windows server

 Virtualization is one of the most important technology feature and Microsoft has invested on this and the responsible role is called as Hyper-V.

Let us now see how to install the Hyper-V Role, for doing this we should follow the steps given below.

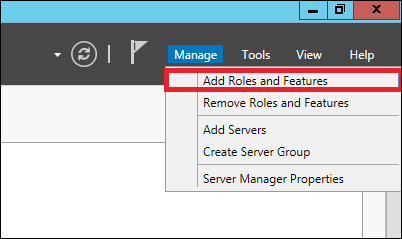
Step 1 − To Install DNS role go to “Server Manager” → Manage → Add Roles and Features.

Manage

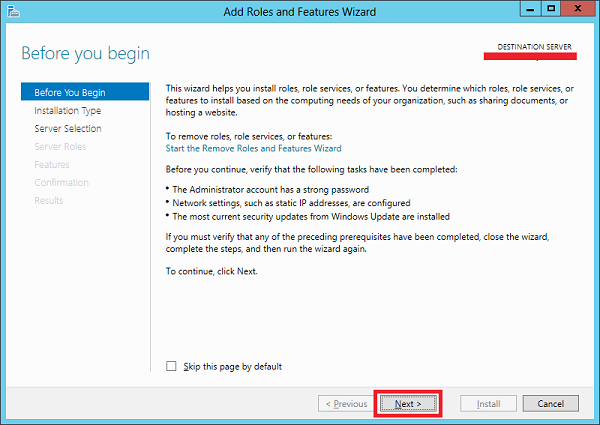
Step 2 − Click Next.

Before you Begin

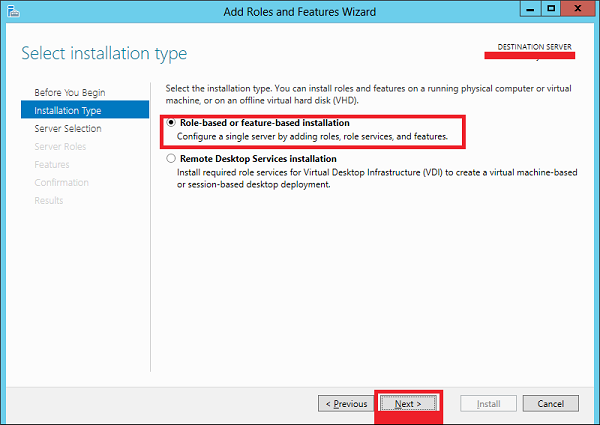
Step 3 − Select the Role-based or feature-based installation option → click Next.

Installation Type

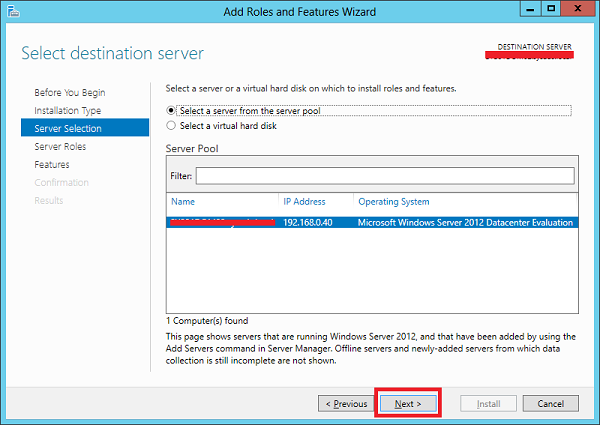
Step 4 − I will install a Local Hyper-V role as it will Select a server from the server pool → Next.

Server Select

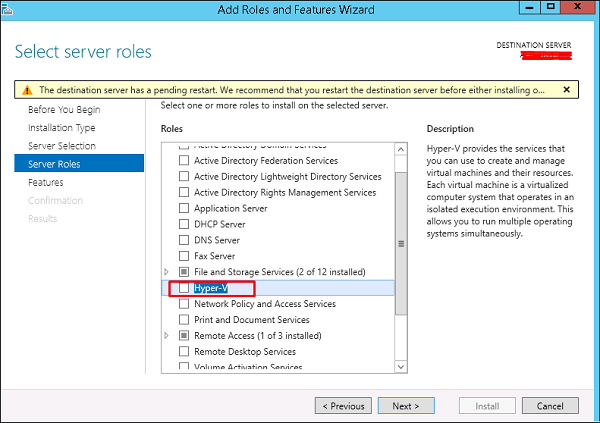
Step 5 − From the Roles lists, check the Hyper-V Server role → click Add Features on the popup windows which show up and then → Next.

Hyper-V Server Role

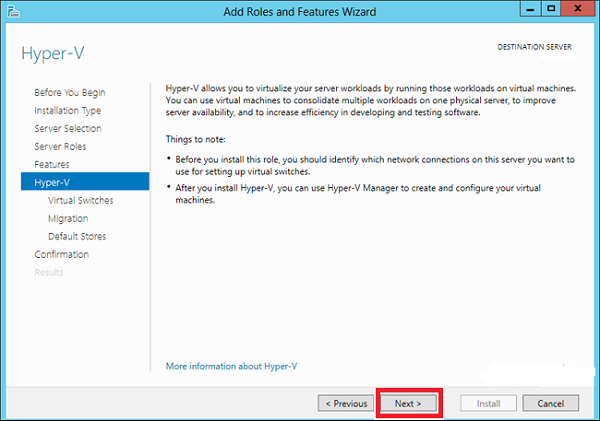
Step 6 − Click Next.

Hyper-V

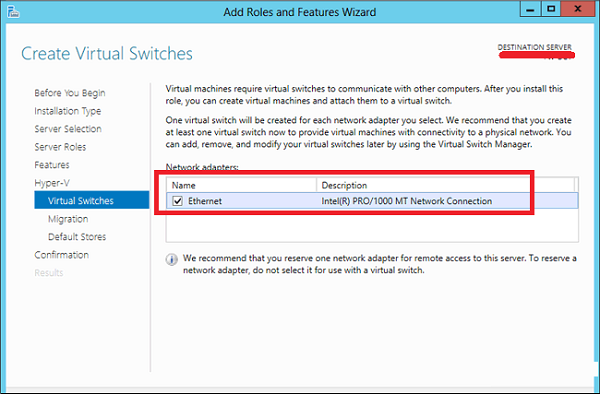
Step 7 − Choose your server’s physical network adapters that will take part in the virtualization → Next.

Virtual Switches

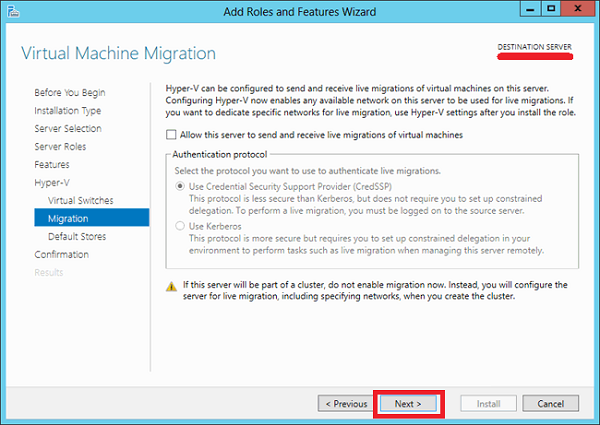
Step 8 − Under Migration, leave the default settings → Next.

Migration

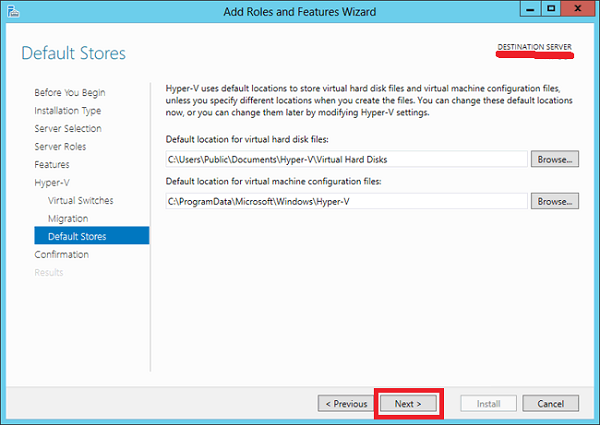
Step 9 − Choose the path where to save the file.

Default Stores

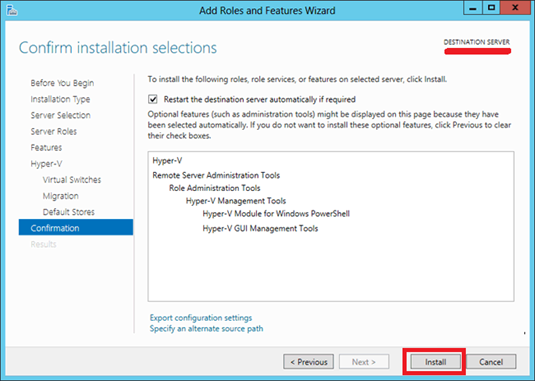
Step 10 − Click Install and wait for the installation bar to finish.

Confirmation Install

Monday, 19 August 2019

Step by Step : Configure DNS Zone Transfer in Windows Server 2012 R2

Step by Step : Configure DNS Zone Transfer in Windows Server 2012 R2


Today lets go through a bit long step on how to configure DNS Zone transfer.

Before i start with the step by step, let go through some information about DNS Zone Transfer.

DNS zone transfers determine how the DNS infrastructure moves DNS zone information from one server to another. Without zone transfers, the various name servers in your organization maintain disparate copies of zone data.

** You also should consider that the zone contains sensitive data, and securing zone transfers is important.

A zone transfer occurs when you replicate the DNS zone that is on one server to another DNS server.

Zone transfers synchronize primary and secondary DNS server zones. This is how DNS builds its resilience on the Internet.

DNS zones must remain updated on primary and secondary servers. Discrepancies in primary and secondary zones can cause service outages and host names that resolve incorrectly.


Orait, that just a small information about DNS Zone Transfer, more information please refer to http://technet.microsoft.com/en-us/library/hh831667.aspx
Reminder : Please practice this step in your isolated network & in your own VM.

Let start with my 1st Server which is OSI-ADDS01.

1 – Before we start with the DNS Zone transfer, lets add some information in DNS, for this demo, i will add New Host in my DNS.

— right click domain name (osi.local), and then click New Host (A or AAAA)…


2 – Next, on the New Host box, i enter OSI-Exchange01 under the Name (this server is my demo Exchange Server),  and then key in the server IP address…


— It should prompt the host record was successfully created.


3 – Next, right click domain name again to create New mail Exchange (MX) record…


4 – On the New Resource Record box, enter FQDN name for the my mail server (Exchange Server) and click OK…


— It should appear in your DNS source list…


5 – Next, still on the OSI-ADDS01 Server, in the DNS console, right click Reverse Lookup Zone and click New Zone…

— FYI, reverse lookup zone resolves an IP address to a domain name, and hosts start of authority (SOA), name server (NS), and pointer (PTR) resource records.

6 – On the New Zone Wizard, click Next…


7 – On the Zone Type, click Primary Zone and click Next to continue…


8 – On the Active Directory Zone Replication Scope, click button no.2 (refer to pic)…


9 – Next on the Reverse Lookup Zone Name box, click IPv4 Reverse Lookup Zone and click Next to continue…


10 – Next on the Reverse Lookup Zone Name, type 712.16 and click Next…


11 – On the Dynamic Update box, click Allow only secure dynamic updates (recommended for Active Directory), then click Next…


12 – Next, click Finish…

13 – Now, let continue installing DNS Services on the OSI-Svr01 (domain member server) which is this server will replicate all the DNS information.


— On the OSI-Svr01 server, in the Select server roles list click DNS Server and click Next to proceed…


— Then on the Select features page, click Next to proceed..


— Then on the DNS Server page, click Next to proceed…

— Next, click Install…

— Once the DNS installation is completed, click Close…


14 – next, please double confirm your IP address on the OSI-Svr01 server…


15 – Next, lets create secondary zone by using Windows PowerShell..

type : Add-DnsServerSecondaryZone -Name “osi.local” -ZoneFile “osi.local.dns” -MasterServers 172.16.0.101


16 – Next, return to domain server (OSI-ADDS01), and open PowerShell, type this cmdlet to enable zone transfer…

Set-DnsServerPrimaryZone -Name “osi.local” –Notify Notifyservers –notifyservers “172.16.0.103” -SecondaryServers “172.16.0.103” –SecureSecondaries TransferToSecureServers


17 – Next, still on the OSI-ADDS01 domain server, open DNS console to refresh the information then right click domain name (osi.local) then click properties…


18 – on the osi.local properties box, click Zone Transfer tab and then verify the IP address and server FQDN… then click notify…


19 – Next, on the Notify box, verify that Svr01 IP Address has been validated and click cancel…


20 – Next, let configure Aging/Scavenging for All our existing Zones, right click Server Name (ADDS01) and click Set Aging/Scavenging for All Zones…


21 – On the Server Aging/Scavenging Properties, click Scavenge stale resource records box and click OK to proceed…


22 – Next, in the Server Aging/Scavenging Confirmation box, click Apply these settings to the existing Active Directory–integrated zones and then click OK…


23 – Our final step, lets verify that our both Domain Server & member server should replicate the DNS resource record.


Sunday, 18 August 2019

Simple Step : Configure FTP Server in Windows Server 2012 R2

 FTP (File Transfer Protocol) is a very popular protocol that allows users to           upload and download files easily.


Even FTP consider a quite legacy data transfer technology, but it still usable and easy to use by some of Server Administrator.

You can configure FTP server in Windows Server 2012 by installing FTP server role.

In this post, I will show you a very simple step how to install and configure FTP server role in Windows Server 2012 R2.

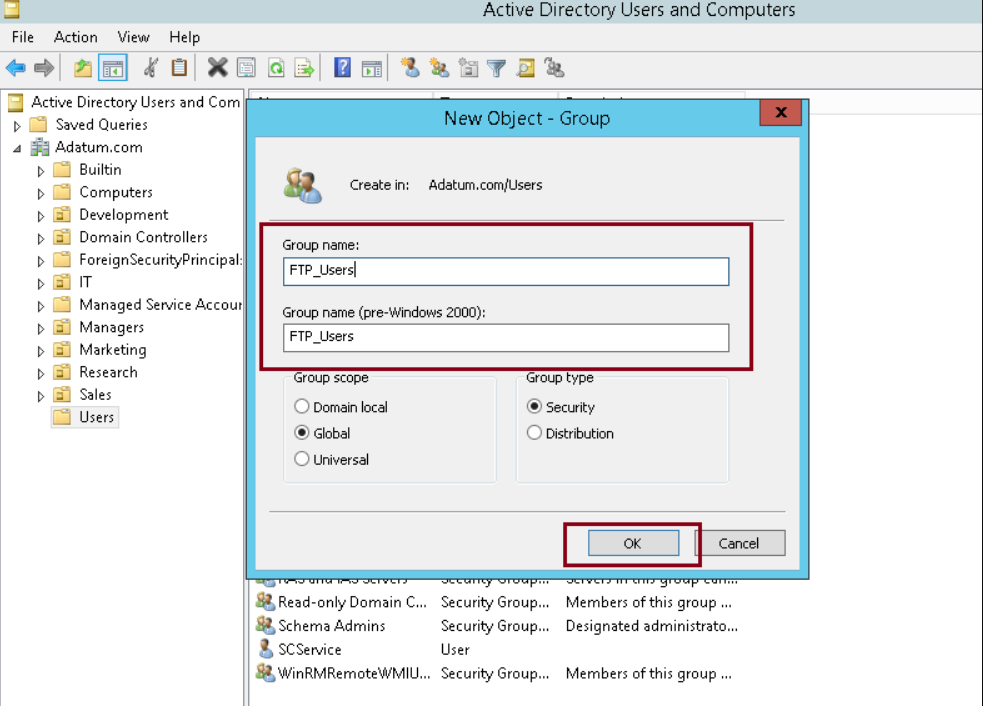
1st – You need to setup authentication for user in Domain environment before installing FTP roles.

https://titanftp.com/2018/09/11/what-is-an-ftp-server/,https://en.wikipedia.org/wiki/File_Transfer_Protocol
FTP Server

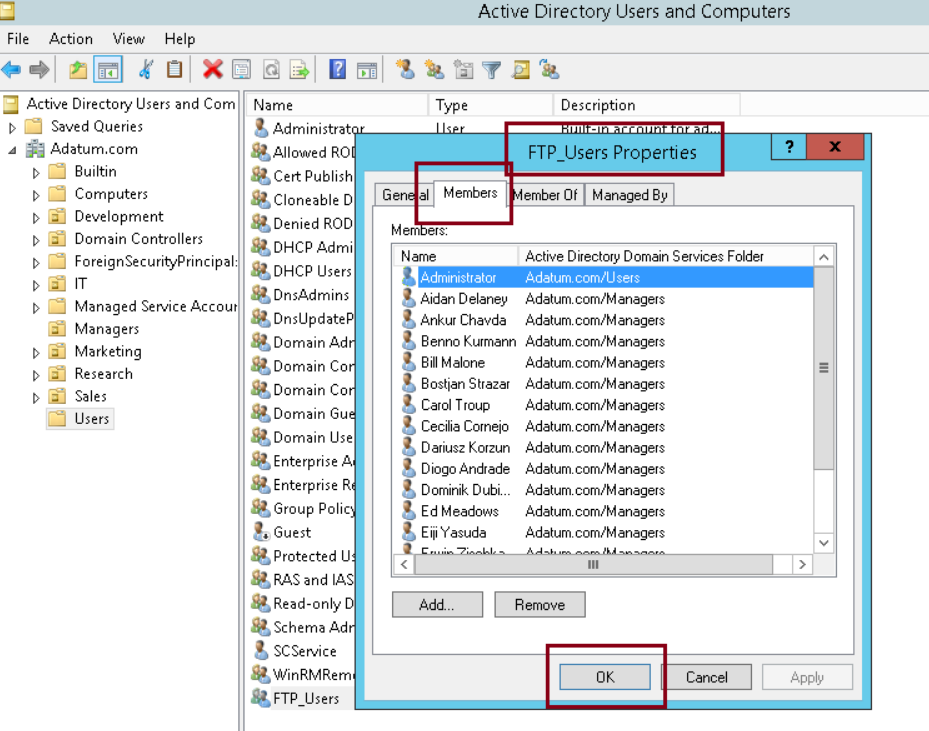
2 – In the FTP_Users properties, please add Administrator and any user that need to use / log in to FTP Server…
https://www.google.com/search?rlz=1C1CHBD_enIN844__844&q=ftp+server+download&sa=X&ved=2ahUKEwiR6vSQkI7kAhUbl48KHScNDcwQ1QIoAHoECAsQAQ&biw=1280&bih=611,https://www.wftpserver.com/download.htm

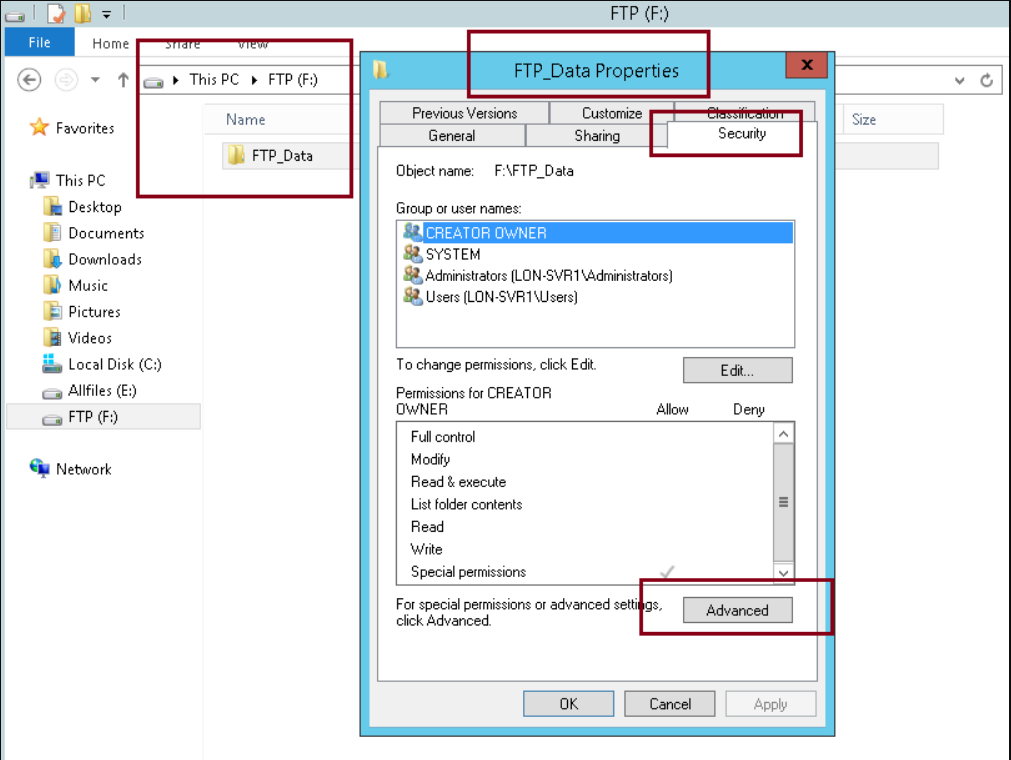
3 – Now lets switch to Member Server, and create a folder for your FTP access then right click the FTP folder and click Security.

** In the FTP folder properties, under Security click Advanced…


  4 – On the Advanced Security Settings for FTP folder, click add…

** what we going to do here is to give access permissions to FTP_Users group…


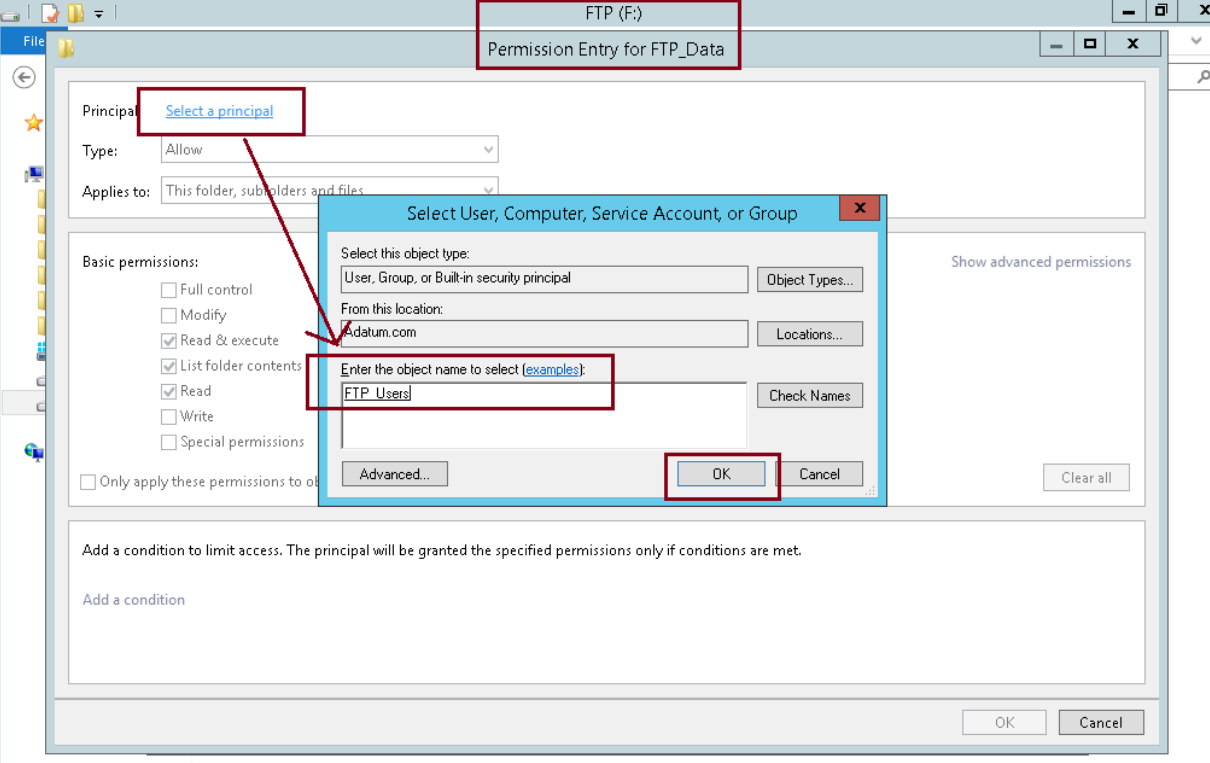
5 – On the Permission Entry for FTP folder, click Select a principal link, then under Enter the object name to select, type FTP_Users and click OK…


6 – On the Permission Entry for FTP folder, under Basic permissions, click Write and then click OK…


7 – verify that FTP_Users is listed under Advanced Security Setting for FTP folder…


2nd – Installing FTP Role service…

1 – Still in the member server, open Server Manager, click Add roles & features and proceed to server roles and browse for FTP Server (click FTP Service and FTP Extensibility), then click Next…

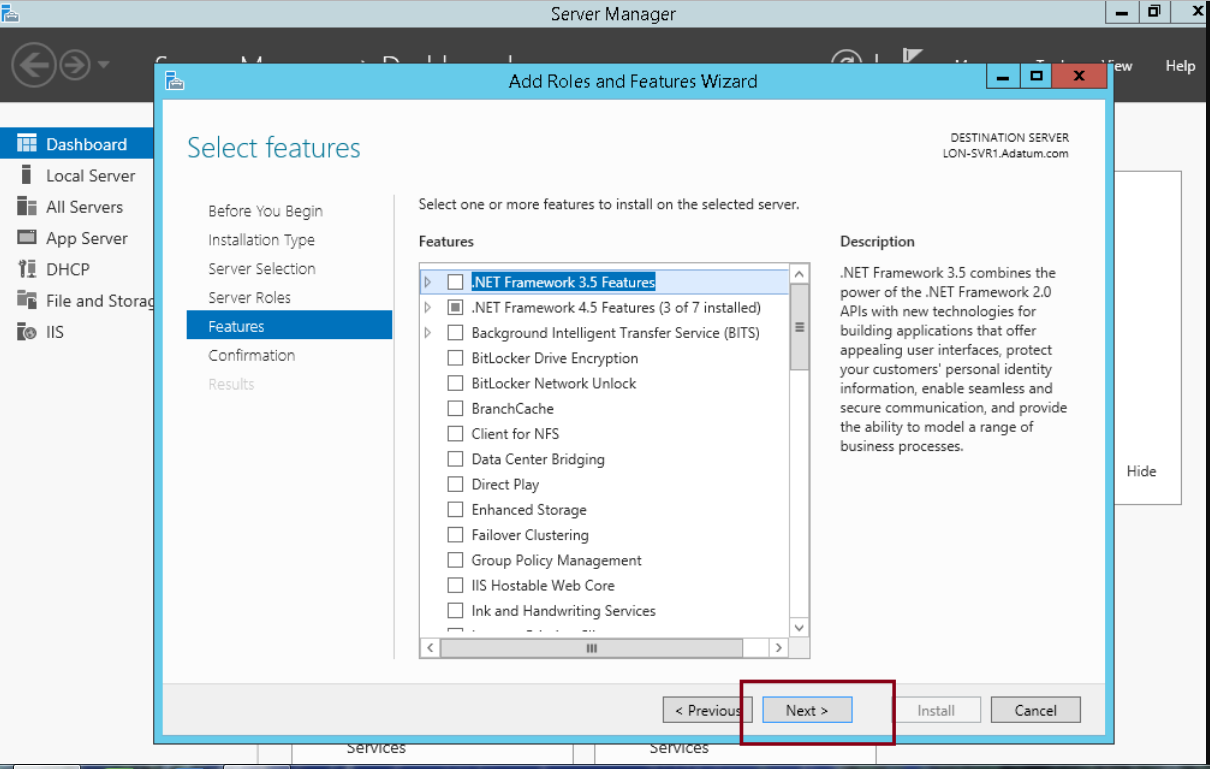
2 – On the Select features interface, proceed with Next…
    

3 – On the Confirm installation selections interface, click Install…


4 – Once installation complete, please restart the Server…


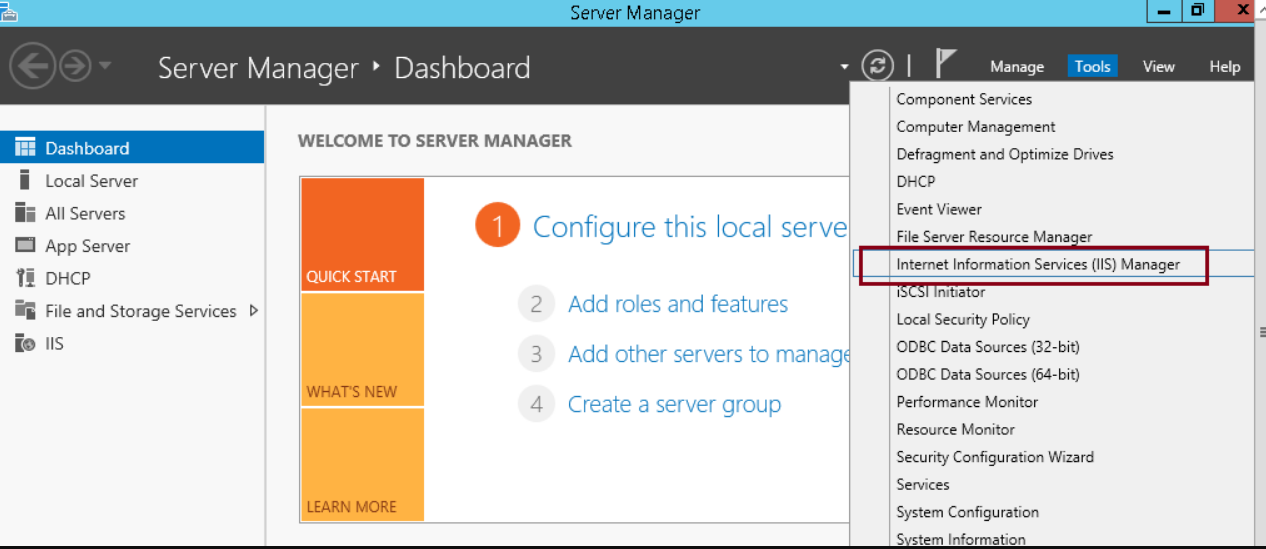
5 – Once server restarted, open Server Manager, click Tools and click Internet Information Services (IIS) Manager…


6 – On the IIS console, right click Sites and click Add FTP Site…


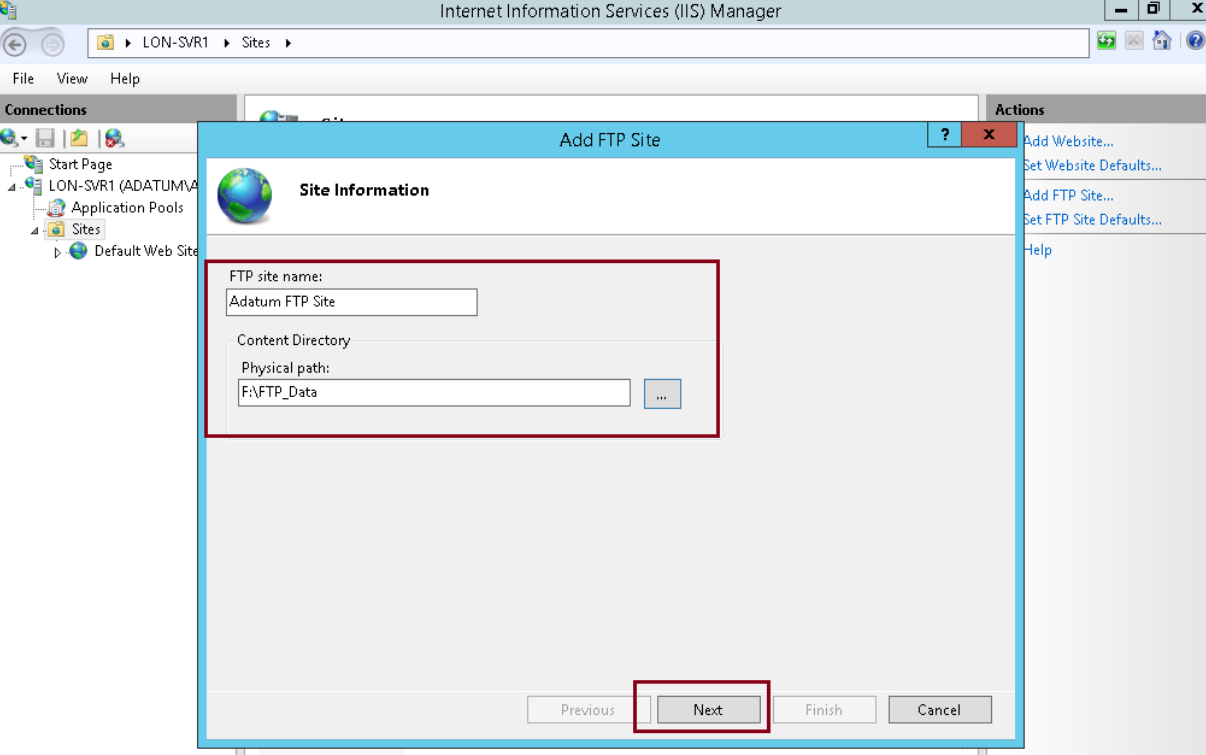
7 – On the Add FTP Site interface, in the FTP Site name:, enter your own FTP site name, then in Physical path, browse to FTP folder that you created in the previous step…

 8 – Under Add FTP Site interface, verify that the IP Address assigned to All Unassigned with Port 21…

** click No SSL (I’m not going to secure this FTP site with web certificates)… and click Next…


9 – Under Authentication click Basic, under Allow access to:, choose Specified roles or user groups and type FTP_Users, confirm that you click Read & write under Permissions, then click Finish…

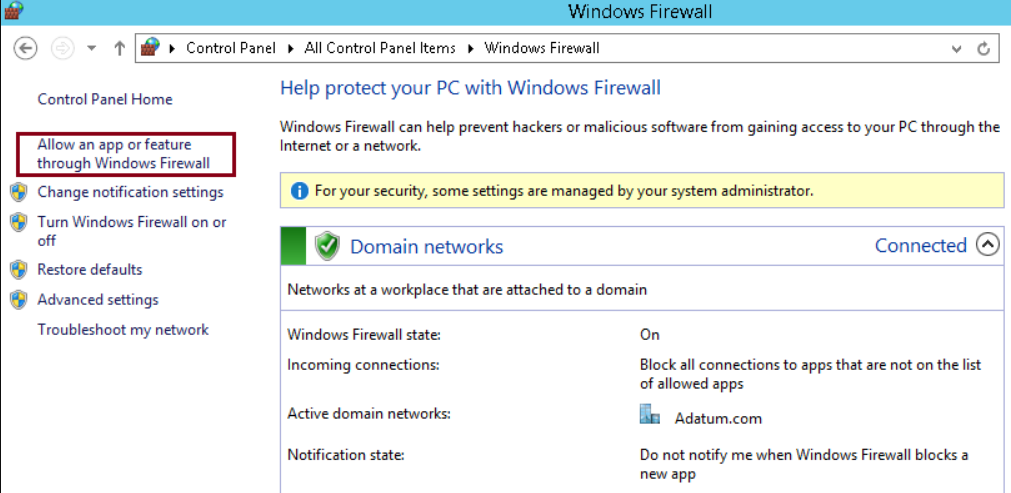
10 – Next, open Windows Firewall and click Allow an app or feature through Windows Firewall…


11 – Under Allow apps to communicate through Windows Firewall, browse to FTP Server and verify that and Domain, Private and Public are ticked, and then click OK…


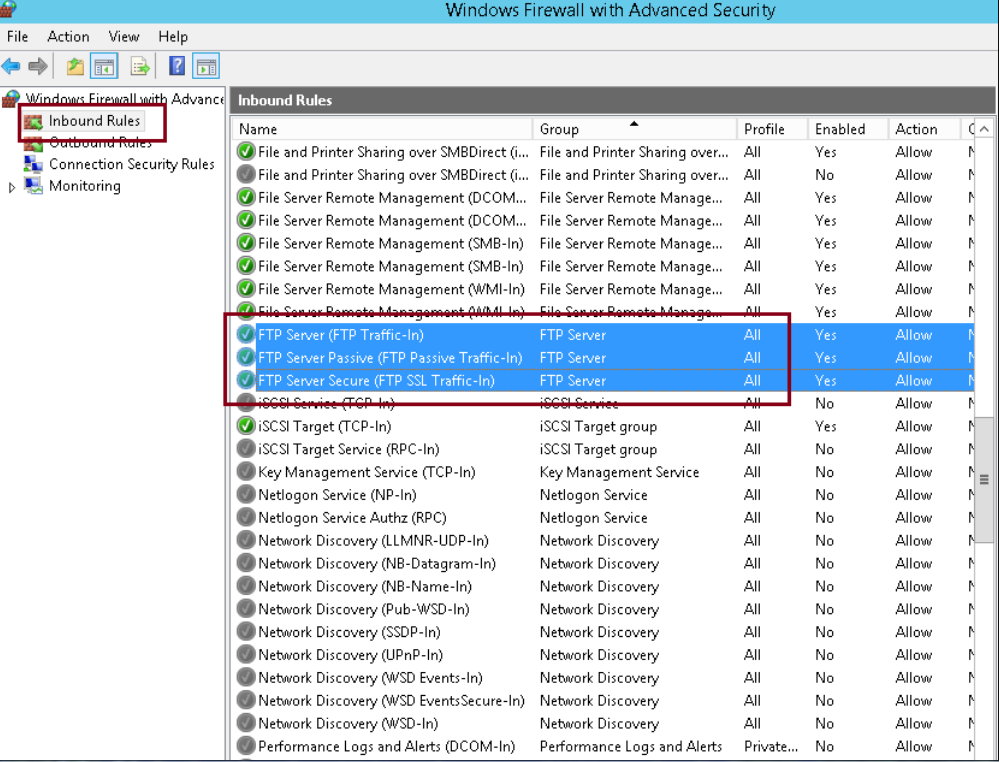
12 – Next, open Windows Firewall with Advanced Security, click Inbound Rules and scroll to FTP (verify that 3 FTP component listed)…


13 – Now, lets switch to client PC (in this demo i use Windows 8.1)…

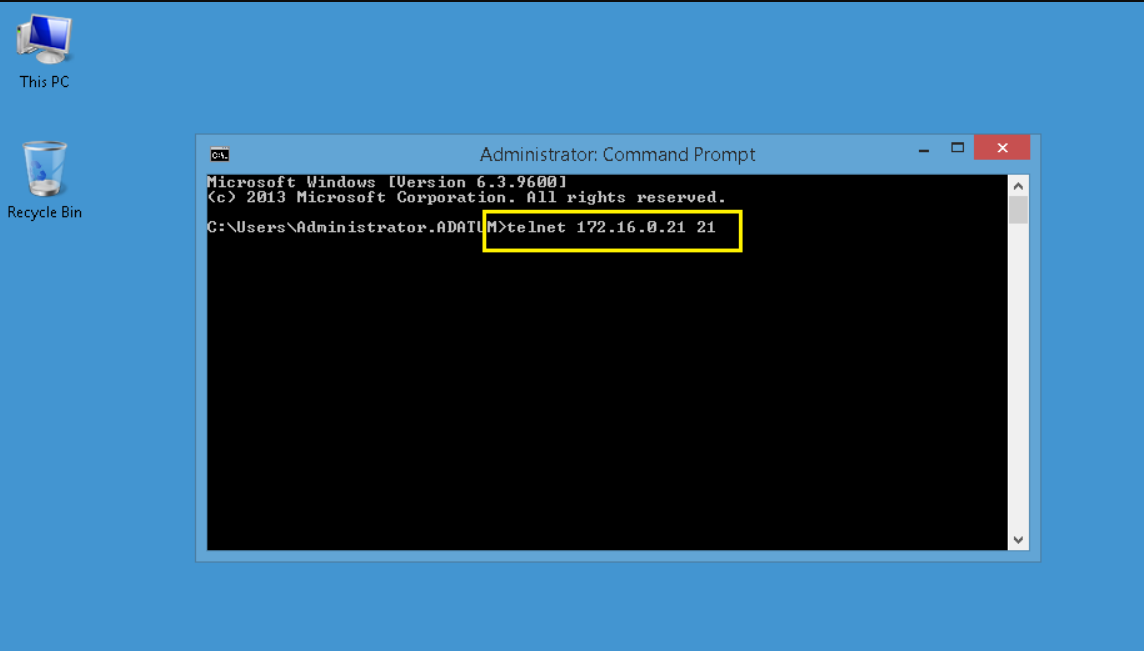
** in the client PC, open CMD and type telnet 172.16.0.21 21

** 172.16.0.21 –> FTP server IP

** 21 –> FTP port number


14 – on the CMD, it stated 220 Microsoft FTP Service (we have successfully connected to FTP Server)…

15 – Now open web browser, in the address bar type ftp://172.16.0.21 and enter, click view menu and then click Open FTP site in File Explorer…


16 – On the Log On As box, under user name, fill in with any of your FTP_Users, then fill in the password and click Log On…


17 – Once you successfully log in to FTP Server, you can try create any folder…


18 – Lastly, switch back to FTP server and confirm that the folder you created is listed in the FTP server…


Orait,  that’s all for now..

Thank you for reading this….


Latest 10 best phone in India 2023

1. Samsung Galaxy S22 : The Galaxy S22 is Samsung's latest flagship phone, released in January 2022. It features a 6.2-inch AMOLED displ...