FTP (File Transfer Protocol) is a very popular protocol that allows users to upload and download files easily.
Even FTP consider a quite legacy data transfer technology, but it still usable and easy to use by some of Server Administrator.
You can configure FTP server in Windows Server 2012 by installing FTP server role.
In this post, I will show you a very simple step how to install and configure FTP server role in Windows Server 2012 R2.
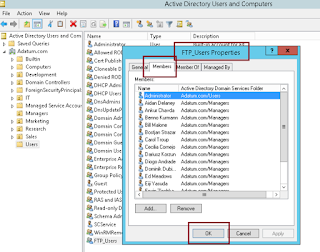
1st – You need to setup authentication for user in Domain environment before installing FTP roles.
 |
| FTP Server |
2 – In the FTP_Users properties, please add Administrator and any user that need to use / log in to FTP Server…
3 – Now lets switch to Member Server, and create a folder for your FTP access then right click the FTP folder and click Security.
** In the FTP folder properties, under Security click Advanced…
** what we going to do here is to give access permissions to FTP_Users group…
5 – On the Permission Entry for FTP folder, click Select a principal link, then under Enter the object name to select, type FTP_Users and click OK…
6 – On the Permission Entry for FTP folder, under Basic permissions, click Write and then click OK…
7 – verify that FTP_Users is listed under Advanced Security Setting for FTP folder…
2nd – Installing FTP Role service…
1 – Still in the member server, open Server Manager, click Add roles & features and proceed to server roles and browse for FTP Server (click FTP Service and FTP Extensibility), then click Next…
2 – On the Select features interface, proceed with Next…
3 – On the Confirm installation selections interface, click Install…
4 – Once installation complete, please restart the Server…
5 – Once server restarted, open Server Manager, click Tools and click Internet Information Services (IIS) Manager…
7 – On the Add FTP Site interface, in the FTP Site name:, enter your own FTP site name, then in Physical path, browse to FTP folder that you created in the previous step…
8 – Under Add FTP Site interface, verify that the IP Address assigned to All Unassigned with Port 21…
** click No SSL (I’m not going to secure this FTP site with web certificates)… and click Next…
9 – Under Authentication click Basic, under Allow access to:, choose Specified roles or user groups and type FTP_Users, confirm that you click Read & write under Permissions, then click Finish…
10 – Next, open Windows Firewall and click Allow an app or feature through Windows Firewall…
11 – Under Allow apps to communicate through Windows Firewall, browse to FTP Server and verify that and Domain, Private and Public are ticked, and then click OK…
13 – Now, lets switch to client PC (in this demo i use Windows 8.1)…
** in the client PC, open CMD and type telnet 172.16.0.21 21
** 172.16.0.21 –> FTP server IP
** 21 –> FTP port number
14 – on the CMD, it stated 220 Microsoft FTP Service (we have successfully connected to FTP Server)…
15 – Now open web browser, in the address bar type ftp://172.16.0.21 and enter, click view menu and then click Open FTP site in File Explorer…
16 – On the Log On As box, under user name, fill in with any of your FTP_Users, then fill in the password and click Log On…
17 – Once you successfully log in to FTP Server, you can try create any folder…
18 – Lastly, switch back to FTP server and confirm that the folder you created is listed in the FTP server…
Orait, that’s all for now..
Thank you for reading this….


.jpeg)


No comments:
Post a Comment